¶ Summary
Adding elements, such as buttons, all follow the same idea:
- Create a new element with a name
- Select its type
- Enter mandatory and optional information
Note that, due to you setting the dimensions of the must-see-area in the previous step (to 500x400), the canvas on which you can place elements is 500x400 pixels.
After the elements have been placed on the canvas, it will then be scaled up to fit the screen, scaling the elements accordingly to keep a consistent look.
¶ How to
- At the bottom of the list, locate the
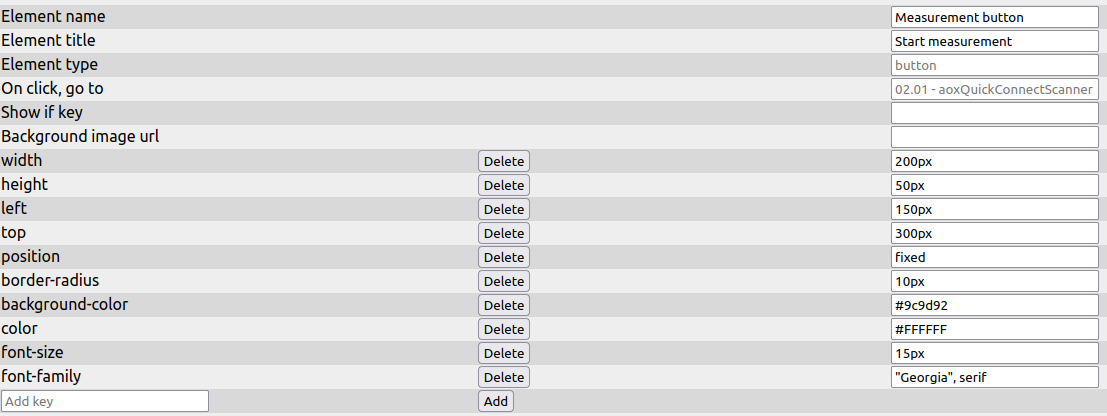
Create a new element-field, and enter the name for the button (e.g.Measurement button). - Click the
add-button next to it to create it. - The button should have appeared above. Locate it, and give it the title
Start measurement. - Click on the
Element type-field, and selectbutton. - Click on the
On click, go to-field, and select02.01 - aoxQuickConnectScanner.- This is one of the pre-build pages you loaded in earlier, and the start of the measurement process. Clicking this button will now jump to the page
02.01 - aoxQuickConnectScanner, which will start the process.
Starting the measurement is one of the functions a page can execute, and will not be covered in this tutorial.
- This is one of the pre-build pages you loaded in earlier, and the start of the measurement process. Clicking this button will now jump to the page
- Set the button's width to
200px, and its height to50px.- Note that some unit needs to be given to these values, in this case
px. If you don't enter any unit, the value will be ignored by the application.
- Note that some unit needs to be given to these values, in this case
- For the button's position, select a left-position of
150pxand a top-position of300px.- This moves it 150px away from the left edge of the screen, and 300px away from the top of the screen.
- Due to the canvas being
500pixels wide, and the button being200pixels wide, leaving a space of150pixels left of it results in a space of the same width right of it, effectively centering the button.
- Save and preview the page again.
¶ Optional settings
While the button now works and is positioned correctly, it looks very simple. The following steps are optional, but will allow you to create a more appealing button.
- Below the last field of the button, find the
Add key-field. Entering a name here, and clicking theAdd-button next to it, creates a new property of the button. - Next to this new property, a value-field will appear, which has to be filled in order to specify the property's value.
- Create the property
border-radius, with a value of10px - Create the property
color, with a value of#FFFFFF - Create the property
background-color, with a value of#9c9d92 - Create the property
font-size, with a value of15px - Create the property
font-family, with a value of"Georgia", serif
- Save and preview the page again.